Photographs can sometimes be enhanced by adding a texture. The texture can often be further enhanced by blending a second texture into the image, thereby increasing its complexity. This can often result in an artistic, painterly look or the retro look of a grainy film image. The best type of photographs for this technique are those with plain, out-of-focus backgrounds - which is why textures are most often applied on images of flowers and birds.
Applying textures to images of people can be somewhat more challenging. Textures applied over a person can make for a most unappealing image. To prevent this, a mask can be used to block the texture from the model. In so doing however, the model's density (brightness) can become different than the density of the textured background (which often makes the image darker), resulting in a subject that looks too bright in relation to the textured background. What follows is a simple, yet ingenious technique to circumvent this problem - without using masks.
The initial image of Andrelica was captured using two vertical strip lights. One was placed to the left and behind her, tilted upward. The second light on the right was directly opposite the first light, but higher and pointed down a little. A 24-70 mm lens, set to 70 mm, on a Nikon D800 was used to capture this image at f/4 and 1/50th of a second.
In Lightroom, the Temp was set to 5135, and Tint was set to +34. Exposure was raised 0.25 of a stop, Shadows raised to +100 (and Blacks raised to +20) to bring out detail in Andrelica's hair. To tone down the bright areas and her shiny shoe, Highlights was lowered to -24 and Whites lowered to -23.
In Photoshop, dark areas of her bright shoe were cloned over the brightest areas to further prevent the viewer's eye from going there. Portraiture (a plugin by Imagenomic) was used to retouch her skin. Even though Portraiture uses its own mask, a white layer mask was added. I painted over areas such as hair, eyes, eyebrows, lips and clothing with a 50% hard black brush at 100% opacity to ensure they received none of Portraiture's skin smoothing.
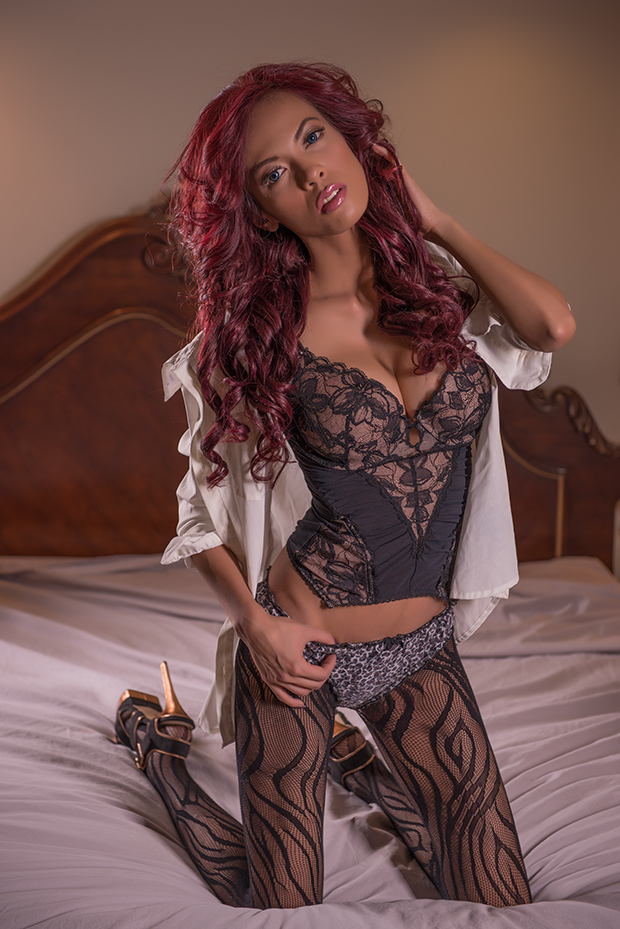
Retouched image of Andrelica.
Over the top of Andrelica, I placed a texture called Azriel Map, from Flypaper Texture's Summer Painterly collection. If desired, resize the texture to fit over the image. Because the layer blending mode is set to the default Normal, the texture obscures the image of Andrelica below:

Azriel Map from Flypaper Textures.
Before doing anything else, use the Eyedropper Tool set to 5 x 5 pixels to sample an average part of the texture. This sets the Foreground Color to the average color of the texture.
To choose a layer blend mode, select Photoshop's Move Tool (V), and repeatedly hit Shift + to quickly see how the other blend modes look. I ended up liking the Overlay blend mode:

The Azriel Map texture layer set to the Overlay blend mode.
The effect is very strong, so the layer opacity was reduced to 15%:

The texture layer's opacity has been reduced to 15%.
Next, we want to remove the texture from her without affecting the density. You can create a new blank layer and paint the Foreground Color (which is, as you may remember, the average color of the texture) over the model. Or, you can do as I did, and use the Direct Selection Tool to make a rough selection of the model, and fill in the selection with the Foreground Color on a new blank layer. Here is how this looks:

On a new blank layer, the average texture color has been applied over the model.
This layer should be clipped to the texture layer beneath. Do this by Option (Alt)-clicking on the border between the two layers. Magically, the texture disappears over the model while maintaining the density of the texture layer over her. The layer opacity can be adjusted downward if some texture on the model is desired. I left it at 100%:

The texture has been removed from the model while maintaining its density on her.
If the color of the texture is undesirable, it can be removed by adding a Black & White adjustment layer and then clipping it to the layer below:

In this particular example, the removal of the color of the texture is barely discernible since the layer opacity of the texture is set to only 15%.

Here is what the Layer Panel looks like at this point.
Next, we will add to the complexity of the first texture by blending in a second texture. This one is called Balthamos Blue, and it is also from Flypaper Textures Summer Painterly collection. As before, we will sample the average color of this texture and it will become the new Foreground Color.

Balthamos Blue texture has been added to the image.
In this case I set the layer blend mode of this texture layer to Soft Light and reduced the layer opacity to 50%:

The second texture layer set to the Soft Light blend mode and its layer opacity set to 50%.
As before, we want to paint the new Foreground Color over the model. But now, we have an easier way to accomplish this. Option (Alt) drag a copy of Layer 1 to the top of the Layer Panel and clip it to the texture layer beneath as before. This again covers the model, but with the wrong color. With this layer active, simply click on the "Lock transparent pixels" icon (the little checkerboard box) at the top of Layer Panel (a small lock icon will appear on the layer), then fill with the Foreground Color by pressing Option-Delete (Alt-Backspace).

The second texture has now been eliminated from the model, but not its density.
The texture has added a slightly blue hue to the model, so we will clip another Black & White adjustment layer to the last layer to drain its color. This returns the more normal color to Andrelica's skin:

The tint of the second texture layer has been drained from the image.
Despite the fact that we have maintained the density of the two textures across the model, I want to direct the viewer's eye to her face and chest. Since the viewer's eyes go to bright (less dense) areas, a Curves adjustment layer was added, its midpoint raised to brighten the image, its layer mask inverted to black to hide the brightness, then white painted on the selected areas of the mask with a soft white brush to reveal the brightness where I wanted it:

Andrelica's face and chest are now a little brighter, but her neck has not been affected, nor has the rest of the image.
Another Curves adjustment layer was added, and its blend mode set to Multiply to darken the entire image. A soft black brush was used to paint over the model on the Curves layer mask. This had the effect of vignetting the image. The layer opacity of this layer was lowered to 50% so the vignette would not draw attention to itself:

A slight vignette has been added to the image.
Since this is a boudoir-style image, I wanted to impart the cool look of crepuscular light. A Photo Filter layer was added as a final touch. I chose the Cooling Filter (82) set to a Density of 50%. To slightly minimize the cool effect on her skin, a low opacity soft black brush was used to paint on this layer's mask over her face and torso. Here is the final result:

The Cooling Filter (82) has been added to yield the final image.
Here is the Layer Panel upon completion of this project:

Screen shot of the Layer Panel.